Gun Design Solutions: 3D Scanning and Reverse Engineering
The firearms industry has undergone a significant transformation from traditional manufacturing methods to precision engineering. Where craftsmen once relied on hand tools and visual inspection, today’s gun design demands dimensional accuracy measured in thousandths of an inch. This shift reflects the modern requirements for safety, reliability, and performance that define contemporary firearms development.
In firearms, dimensional accuracy means everything. Tiny variations cause major issues:
- Barrel bore variations by mere thousandths of an inch can affect accuracy and pressure dynamics
- Trigger mechanisms require precise tolerancing to function safely and consistently
- Chamber dimensions must maintain exact specifications to prevent dangerous pressure variations
- Bolt face geometry directly impacts cartridge alignment and extraction reliability
Gun manufacturers face tough safety and reliability demands. Parts experience extreme pressures, high temperatures, and repeated stress cycles while needing to hold tight dimensions. When dimensions drift in firearms, the results can be deadly – from simple misfires to catastrophic pressure failures. That’s why manufacturers now rely on precision measurement equipment to catch problems before parts go into production.
Getting Inside Firearms Without Taking Them Apart
Non-contact measurement has changed how we approach gun design. Traditional methods can’t handle the complex curves and angles in firearms parts. Our laser scanning and structured light systems collect millions of data points without touching the part. This matters when you’re measuring heat-treated or precision-machined surfaces that a contact probe could scratch or damage.
Our scanning systems give you complete data:
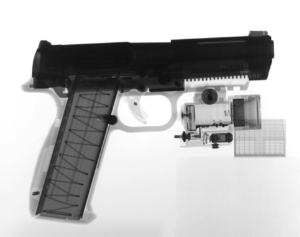
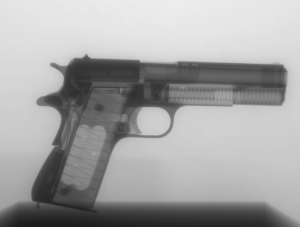
- Industrial CT scanning reveals internal structures without destructive testing
- Laser scanning captures external geometries with 0.0002″ accuracy
- Structured light scanning documents complex surface features and textures
- Long-range scanning handles large assemblies and complete firearms
We create accurate digital twins of firearms components from high-resolution scanning data. These digital models work for design verification, manufacturing planning, and quality control. Designers can analyze stress points, optimize material distribution, and simulate performance before building prototypes.
Our reverse engineering team works with Siemens NX, SolidWorks, Creo, and other major CAD platforms to convert scan data into parametric models. Engineers can modify grip angles, adjust trigger geometries, or optimize weight distribution while keeping the original mechanical function.
Recreating Guns Without Documentation
Many historical guns have poor documentation, and the original companies went out of business years ago. We start by scanning existing parts with multiple technologies, capturing outside geometry and using CT scanning to see inside mechanisms when possible.
Many manufacturers want to update old designs for modern production. Today’s manufacturing methods often need different tolerances or materials than the originals used. We combine scan data with tolerance analysis to create drawings that work with current manufacturing while keeping the original function.
Turning physical parts into CAD models takes more than just measurements. Our reverse engineering process includes:
- Understanding component function and mechanical relationships
- Identifying manufacturing features and critical dimensions
- Creating tolerance stacks using GD&T principles
- Developing parametric models for design modifications
- Generating manufacturing-ready documentation and drawings
Our certified engineers create tolerance stacks that guarantee proper fit and function across manufacturing variation. This analysis identifies which dimensions are critical to function and which can handle broader tolerances for cost-effective manufacturing.
First Article Inspection for Firearms
First Article Inspection (FAI) for firearms manufacturing checks that new production processes can meet design specs. We do complete dimensional inspection of initial production parts and compare results against requirements. Our ISO/IEC 17025 certification backs up our inspection reports and helps with regulatory compliance.
Checking critical tolerances in firearms means you need the right measurement uncertainty ratios. Gun tolerances are often at the edge of what manufacturing can hold, so you need measuring equipment that’s accurate enough to tell if parts are good or bad. Our CMMs and optical systems handle these tight tolerances. We calculate and report measurement uncertainty for every dimension so the inspection data holds up.
CT scanning lets us see inside parts we can’t inspect any other way:
- Internal passage measurement without taking parts apart
- Wall thickness checks throughout complex shapes
- Finding internal defects like porosity or inclusions
- Assembly clearance analysis for multi-part systems
- Measuring features you can’t reach with other tools
Our inspection reports include equipment calibration records, measurement procedures, and detailed results for each requirement. This documentation supports regulatory compliance and gives you the quality records firearms manufacturing needs. We use conditional formatting to highlight dimensions getting close to spec limits so you can fix problems before they happen.
The Technology Behind Our Gun Design Services
Industrial X-ray and CT scanning let us see inside firearms without taking them apart. These technologies show internal structures, catch manufacturing defects, and measure features you can’t reach with traditional tools. Our 160kV, 225kV, and 450kV X-ray systems handle everything from small precision parts to complete assemblies.
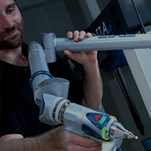
Our 7-axis articulating arms with laser scanning give us flexibility for complex geometries. We can position and measure components that won’t fit in traditional coordinate measuring setups. This flexibility means we can measure more features on difficult parts.
Temperature control matters for precision measurement. Our 24,000-square-foot climate-controlled facility keeps conditions stable during data collection. We have the equipment needed for gun design work:
- Multiple X-ray and CT systems for different component sizes
- Coordinate measuring machines with sub-micron accuracy
- Laser scanning systems capturing 1,000,000 points per second
- Climate controls for measurement stability
- Complete CAD modeling and reverse engineering software
Our specialized equipment, experienced engineers, and proper certifications let us handle gun design projects from concept through production. With 150+ years of combined experience including firearms work, we have the technical knowledge to get your projects done right.
Why Choose 3D Engineering Solutions
3D Engineering Solutions brings over 150 years of combined industry experience to advanced engineering metrology. Founded by engineers who understand manufacturing challenges firsthand, we’ve built our reputation on solving complex measurement and reverse engineering problems.
Our 24,000-square-foot temperature-controlled facility in Cincinnati houses state-of-the-art metrology equipment. We have multiple CMMs, laser scanners, structured light systems, and four Nikon X-ray/CT machines.
We work across multiple industries including aerospace, automotive, tool and die, manufacturing, forensics, archaeology, medicine, and maritime applications. Our firearms and explosives expertise serves both civilian and military markets. From single prototype parts to high-volume production runs, we scale our services to match project requirements.
We combine the right equipment, experienced staff, and proper certifications under one roof. Our independence as a third-party measurement source builds trust between suppliers and customers. We provide 24/7 service for time-critical projects and have the capacity to handle large-volume work. Most importantly, we focus on getting you accurate data quickly so you can make decisions and keep projects moving.
Frequently Asked Questions
Can you reverse engineer firearms that don’t have any documentation?
Yes, we handle this regularly. Many antique or discontinued firearms have poor documentation or the original manufacturers went out of business. We use multiple scanning technologies to capture both external geometry and internal mechanisms. Our engineers then create complete CAD models and manufacturing drawings from the scan data.
What’s the difference between your scanning technologies?
Each technology has strengths for different applications. Laser scanning captures external geometry with high accuracy. Structured light scanning documents surface features and textures. Industrial CT scanning reveals internal structures without taking parts apart. Long-range scanning handles complete firearms and large assemblies. We pick the right combination based on what you need to measure.
What makes you different from other measurement services?
We specialize in firearms work with the proper licenses and certifications. Our independence as a third-party service builds trust between suppliers and customers. We have all the measurement technologies under one roof, so you don’t need to coordinate between multiple vendors. Our engineers have design backgrounds, not just measurement experience.

